Microphones 13
Differentiating microphone pre-amplifiers
- Video
- Script
Welcome to this tutorial on the differences between microphone pre-amplifiers.
Microphone pre-amplifiers play an important part in the recording process and can make a useful contribution to the character of the sound. In this video we will examine the primary design factors that differentiate them, and how these factors affect their uses and audible character.
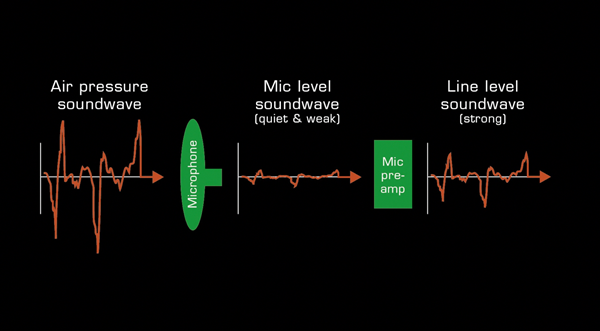
A microphone pre-amplifier performs a simple but essential job. It must amplify the very quiet mic level signal coming from a microphone to line level so that it can be processed, recorded and sent to a PA or monitoring system. It must do this without distorting or introducing unwanted artefacts into the signal.
Caption - Ergonomics
The first thing we need to look at when choosing a mic pre are it's features. Some mic pre's are minimalist, whilst others are designed to accommodate a wide variety of microphone types and recording set-ups. Here are the primary things to look out for ..
- Balanced XLR mic input
- Balanced XLR line output
- Hi-Z DI instrument input for connecting an electric guitar or bass guitar
- Send return insert connections - to allow the connection of a compressor or EQ
- Gain control - to control the input gain
- Input gain metering - some mic pre's only have a single LED which changes colour according to the signal level, whilst others will have segmented peak metering or a VU meter.
- Output level control - to attenuate the output level. This is useful if you are driving the input hard in order to add harmonic colouration and need to reduce the output level
- Trim control - which may allow fine tuning of either the input gain or output level
- Phantom power
- A pad switch to reduce the input circuitry sensitivity and prevent input overloads
- Polarity reverse - useful for multi-mic'ing situations
- Impedance control - to accommodate the needs of different microphone types, especially ribbon mics. Condenser and dynamic mics operate well with an impedance input of between 500 and 8000 Ohms, 2000 Ohms being typical. Changing the impedance can have a subtle effect on the frequency response. Ribbon mics will need something like 20 k Ohms.
- A dedicated ribbon microphone mode - which will raise the input impedance and disable accidental enabling of phantom power
- High pass filter - to roll off unwanted low frequencies
- Form factor - do we need the device to be portable, stand alone, rack mountable, or integrated into another device, such as an audio interface?
Caption - Technical specifications
The technical specifications of a mic-pre amp will give you some indication of the quality of its design and manufacture. The primary things to look out for are ..
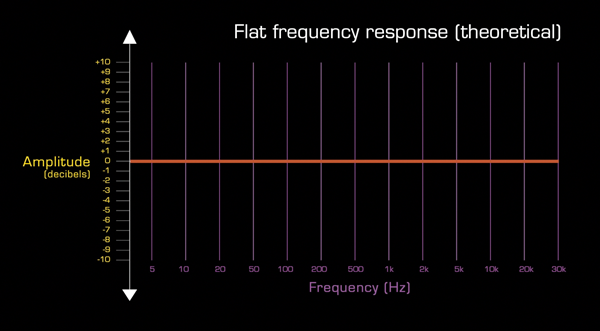
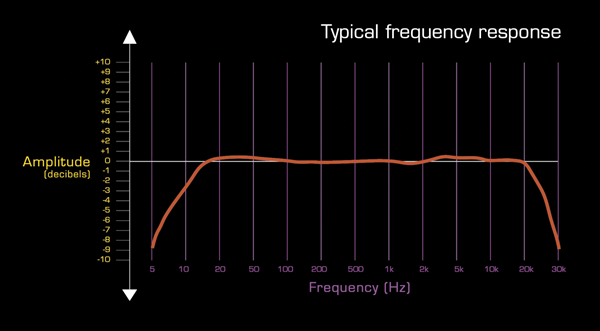
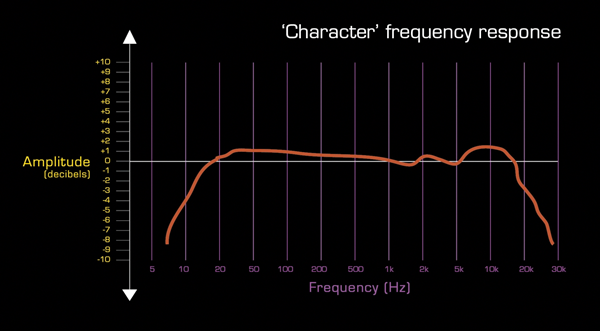
Frequency response - unless we have a specific need, we will want this to be as wide and flat as possible. This means at least 20Hz to 20kHz with no significant changes at any frequencies. We may not always want a flat response, and prefer a response that boosts some frequencies perhaps in order to add clarity or definition, but either way we can check the frequency graph if one is available.
Noise performance - mic pre spec's contain various confusing statistics on noise and distortion. Most devices perform extremely well or adequately, however, if we plan to record very quiet and delicate sources we will want to test performance audibly.
Dynamic range - An input gain range of between 0 and 60dB is typical and should accommodate most situations, especially if a trim control offers another 10dB or so of additional gain.
Caption - Transparency vs character
In the early years of microphone pre-amp design, the limitations of available electronics made it difficult to process a signal without distorting it in some way. As designs improved, these distortions became more acceptable, even desirable sometimes, adding harmonic colour and enhancing the signal. Today we refer to such designs as vintage or classic and the sound they produce as being silky and smooth or having character or warmth.
Modern electronic components have advanced to a point where transparent cost effective designs are common place, distortions are to all intents and purposes inaudible, and the full character of a microphone is revealed. In fact, the differences are so small its hard for even experienced engineers to identify devices in blind tests.
It is worth saying that even differences between transparent and character designs can be hard for the untrained ear to detect, and that choice of mic pre-amp usually has less of an impact on a recording than the choice of mic and its positioning.
However, many characterful designs are still manufactured and we therefore have a great deal of choice.
Caption - Character
There are many components that contribute to giving a mic-pre its unique signature sound, but perhaps the 2 biggest are ..
- the use of valves or tubes in the circuitry
- and, transformers on the signal input and output stages
There are 2 primary ways in which components such as these can effect the signal.
Caption - 1. Slew rate
Firstly, slew rate. The slew rate is a measure of how fast an amplifier can respond to sudden changes in amplitude, especially those that occur at the transient, or attack of a sound.
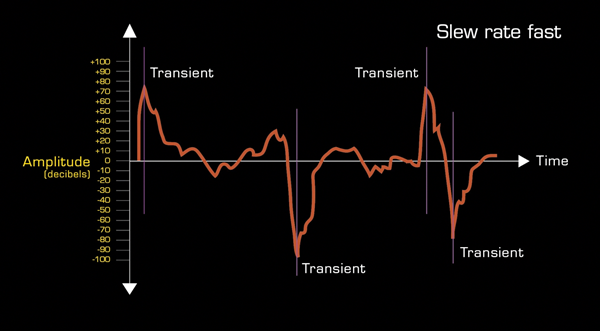
Early designs had slower slew rates which tended to soften or smear transients. This has the effect of making the signal sound more organic and less detailed, and can be useful in minimising the sounds of clicks and pops from instruments and saliva.

Caption - 2. Harmonic colouration
Secondly, harmonic distortion or colouration. Harmonic distortion was originally an unwanted side effect of early electronics but is now recognised as a useful effect. Even integer multiple harmonics tend to thicken the sound, whilst odd integer multiple harmonics can add some brightness. These effects can be subtle, and difficult to achieve with other processors such as EQ or exciters.
Caption - Comparing three mic pre-amps
Demonstration - Sound Skulptor M573, Grace Design m501, and Dave Hill Designs Europa.
For this demonstration we are going to look at three devices ..
- The Sound Skulptor MP573 is a re-creation of the classic 1970 Rupert Neve design for the Neve 1073 studio console. This device utilises Carnhill transformers on the input and output signal path, and these, together with a slow slew rate, deliver a smooth sound in which transient are smeared and harmonic colour is added.
- The Grace Design m501 - a modern transparent transformer-less design
- And finally, the Dave Hill Designs Europa - a unique design than utilises digital control to allow the slew rate and amount of additional harmonic content to be determined by the user.
Caption - Thanks for watching
The script for this video, with accompanying images, can be found at projectstudiohandbook.com
We suggest you subscribe at our YouTube channel, and join our mailing list at our website to receive notification of new videos, blog posts and subscriber only extras.
Thanks for watching.